Related Posts with Thumbnails

Monday 29 March 2010

Silversmithing


Making a Silver Box


I have just completed a weeks worth of Silversmithing at Central Saint Martins College under the guidance of Linda Robertson who is a practicing Silversmith.

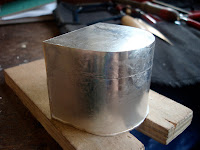
Our project was to make a silver box. Here are some pictures to show you how the box developed from sheet silver to fully functioning box!

After lots of cutting pieces of silver to size the first step was to form the shape of the box on a mandrel.


The back is soldered to the form


After each Soldering the piece is put into a 'Pickle Bath' to clean it up


The base is soldered in place. A hole is pierced in the side before soldering the lid to the top and then another trip to the Pickle Bath.


Then the really scary part - the cutting of the lid!!!


Of course all these steps also required a lot of preparation such as measuring, marking, filing and preparing the silver for soldering.


Next the bezel which holds the lid in place was made using the same method as the box and soldered in place


Now the really labourious part! Lots of piercing with a saw blade! I lost count of the amount of blades I broke! Some time later I managed to get rid of all the excess silver


all the edges of the box had to be smoothed and blended so that they appeared seemless.


Files, emery and sanding papers and lots of elbow grease later,  my box started to emerge as something half decent! I still have a tiny bit of sanding and finishing left to do but I'm very pleased with what I produced! 
Now I think my arms need a good rest!


Monday 15 March 2010

Mother's Day!

I hope all you Mothers out there were treated well this Mother's Day! I had a lovely relaxing day with my boys and I also was pleased to be the recipient of these gorgeous Earrings from Beadypool.

I was the lucky Winner of Beadypool's Mothering Sunday Competition. I have always admired Beadypool's work - she only uses Artisan Lampwork Beads and her work is very classy and beautiful. Thank you Beadypool!

All you Jewellery Makers out there should start quaking in your boots as there are two new designers in town! My 5 Year Old Twin Boys made me these lovely necklaces at School for Mother's Day!

I am still happily beavering away at my own little projects. I have recently made some Copper Viking Weave Choker Necklaces to go with the Bracelets.

Coming Soon....

My first taste of Silversmithing!
&
My favourite thing : CUPCAKES!!!!

Monday 8 March 2010

Silver and Polymer Clay Revisited


I forgot to mention in the title that I have also revisited Wire Crochet too! The Silver Corsage was made for a wedding and eventually was attached to a hair band. The Purple Flower added an extra special finishing touch to a 40th Birthday Cake I made. The Stone is Amethyst - the Birthday Girl's Birthstone. This could also be used as a hair decoration or put in a pretty spill vase as decoration.


I'm still unsure about PMC (Precious Metal Clay). It's possibilities are endless but I find having to work with something so quickly before it dries out a bit of a pain! I did however have another go at Fingerprint Jewellery. First was a Silver Hanging Heart Pendant with three childrens' prints

I used the same prints to make three smaller charms to be attached to a Bracelet

I went on a Polymer Clay Course quite a while ago now and as with most things I shelved it for a later date!

One rainy day the Children discovered my stash and were particularly impressed with having to put the Clay through the Pasta Machine to condition it and roll it out. I ended up playing with a few scraps of clay too and made myself a pretty bracelet. I left the beads with a matt finish but did try out varnishing a few to see what they looked like. The kids' Mood Sand proved very useful for holding the cocktail sticks with the Beads on ready for Varnishing! I have to say I prefer the Beads unvarnished with a bit of Sanding and a polish with a cloth.