Related Posts with Thumbnails

Monday 5 December 2011

Would you like to see my Etching?


Hello Dear Neglected Blog! How life has a nasty habit of sidetracking us! I have been busy learning new skills and creating new pieces. I found a use for a piece of silver which wasn't quite big enough to form a Bangle. It turned into a Cuff instead and fits so snuggly you hardly feel you're wearing it!

Blacked out off-cut of Silver with design scratched on

The Etched design out of the Acid Bath

Ready for a good hammering

The Finished Cuff

Back Soon I hope! Have a great Christmas everyone! 

Friday 24 June 2011

Cake Pops

I find myself on a break from Jewellery and indulging in my other passion CAKE! I recently made a novelty cake and found myself wondering what I could do with all the wasted sponge without instantly eating it with my Coffee! What to do with all this waste?

Lovely Sprinkles!
First - put it in the freezer until I'm ready to use it! Someone suggested Cake Pops. I must say that to me Cake Pops seemed like the equivalent of reformed Ham and I'm a Vegetarian! Not really what I'd like to eat but it's for the Kids!


I purchased the Queen of Cake Pop Bakerella's Book, conveniently titled "Cake Pops". There are some great ideas in there but it's an American book with ingredients which don't easily translate. Everything is made with American ready box mixes and Sweets and so on....Thought I'd have a go anyway and blindly continued.

Well here's what I learned from my first attempt:

1. Make sure you Crumb your cake very finely

2. The mixture must be moist and not too dry

3. Your Chocolate Coating must be nice and runny

I used Wilton's Candy Melts

4. Make sure the Cake Balls aren't too big

Uncoated Cake Pops with Sticks inserted

5. don't remove cake balls from fridge too soon

Cake Pops in my Homemade Holder

6. don't ignore all the above as it may lead to your cake Pop falling apart!!

Friday Treat for the kids when they get home

I started with 10 cake balls and by the end had 6 complete Cake Pops - only 4 casulaties! I'm not in too much of a hurry to make them again!

Wednesday 27 April 2011

Sea Glass

I love Sea Glass but have never had much success finding any, until now. 

My small stash of finds

I'm probably looking in all the wrong places! I was thrilled to find a handful of pieces on a Dorset Beach more renowned for its Fossils than anything else! They are not great Specimens but they are still the first bits I found myself! My treasure.


Sea Glass for those of you who don't know are pieces of broken glass which have found their way into the sea long long ago. They have been tumbled through time becoming a smooth pebble and an opaque thing of beauty! They are the Jewels of the Sea and can come in many different colours.


Fossils in Dorset

I like the idea of recycling Sea Glass into Jewellery pieces. Turning something that was once discarded as rubbish into something beautiful.


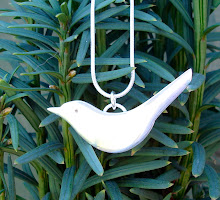
Tweet! Tweet!

I made myself a Twitter Bird Pendant out of Silver sheet. Looking forward to finding the time to make more! Maybe bigger more elaborate Birds! Small steps....

Wednesday 23 March 2011

Wax Carving Continued

My first attempt at Wax Carving wasn't that successful, the wax ending up snapping into pieces! That's the one on the right (below) prior to it's destruction.


 One of my rings did work. It isn't a world class piece of symmetry, I like to think of it as a more 'organic' piece. In fact I'm falling in love with organic shapes as they don't call for such perfection and mathematical accuracy! So here is  my ring now it has been cast in Silver.


I am going to stick at the Wax and learn a little more as I only scratched the surface (literally and metaphorically speaking!). I can see the possibilities...

I did manage to put the Resin to use after saying I probably wouldn't do it again! I made a Cake for Red Nose Day which was auctioned off to Staff at my Husband's place of work. I made a little Logo out of Resin to decorate the cake with. Not sure this is the correct use of Resin or that it met health and safety standards, but I can assure everyone nobody died as a result of eating my cake and it raised some cash for a good cause!

Red Nose Day Cake

Friday 18 February 2011

Resin

Ready to go!
I have 'had a go' with using Resin before. It was very smelly and I ended up throwing my creations in the garden to 'air'.

Pleased to say that now you can buy low odour stuff which makes working with it a lot more pleasant - especially when you're working in your home!

As part of a College project I had to create some resin pieces. I acquired some moulds although you can use other improvised things as long as the Resin isn't going to react with it and it will be flexible enough to get your piece out afterwards!. I had some packs of artificial Gold, Silver and Copper Leaf left over from a previous crafting venture which I thought would do well in Resin.

The Gold and Copper leaf Bangles turned out nicely (though not something I'd wear myself!).  So did the Rectangle Shapes.

Rectangles

Bangles 

I made a fatal error with the Silver Leaf Bangle; make sure you mix your quantities of Resin and Hardener properly and precisely! This Bangle is meant to be hard but I could bend it in half like a piece of rubber!

Big Mistake - Bendy!!!!

The above pieces need to be filed and sanded and polished. An old Nail File, Wet and Dry Sand Paper and some water is used to tidy up the edges, then some Vonax Polishing Compound for Resin and Perspex.

That's that! I was surprised how far my two small bottles of Resin and Hardener actually went. I still have half the bottles left. Not sure I'll be pursuing Resin any further though, at this point...

Monday 17 January 2011

Wax Carving

Christmas seems like a dim and distant memory. Today Monday 17th January is meant to be the gloomiest day of the year - gloomy it is - the rain is pouring! A good day to stay in and potter about. I do find it hard to get motivated but today I did manage to focus on a few things.


I've been having a go at wax carving. I've started with a ring. Basically you cut a piece off a special wax tube and create what you want with the right tools and know how!


I haven't finished yet - still fiddling around with melting blobs and using a MAX WAX tool - which is basically a heated wire which enables you to cut or draw a pattern onto your wax. Wax Carving doesn't limit you to ring making. Wax blocks can be used to carve almost anything you want.

I haven't had anything Cast into Silver yet so I will unveil the results on another occasion!

Now for the unveiling of my first Bezel Setting Ring! I used an Amethyst Cabochon.


It's not perfect but it looks ok when I'm wearing it! This project turned out not to be as difficult as I was expecting and I'll certainly have a go at some more - with large Cabochons so it's not so fiddly!